Gutter maintenance is an essential task that homeowners should pay attention to. Proper gutter installation is important, but regular maintenance is equally necessary to extend the lifespan of your gutters and ensure that your gutter system functions correctly. Neglecting Gutters and Downspouts maintenance can lead to clogged drains, which can cause water to overflow and damage your roof, walls, and foundation.
Regular sheet cleaning and inspection will keep your gutters functioning correctly all year round. You should schedule a cleaning at least twice yearly – once in the spring after trees have dropped their seeds and again in the fall after leaves have fallen from trees.
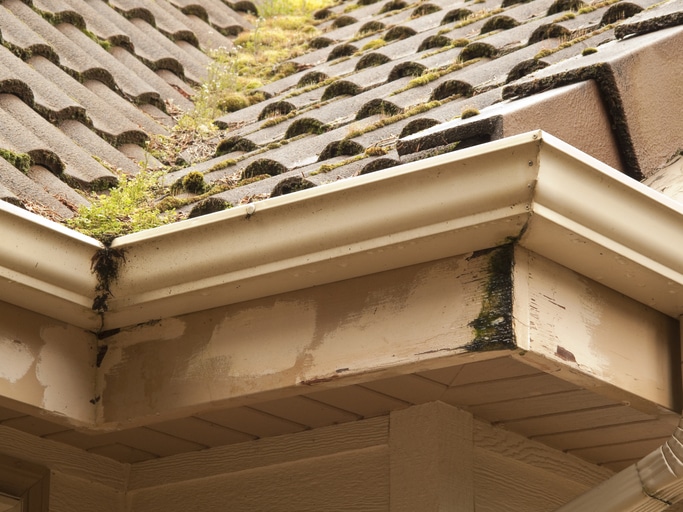
Checking for Rust, Leaks, and Holes in Your Gutters
Regularly Inspect Your Gutters for Rust, Leaks, and Holes
Gutters are an essential part of any home’s roofing system. They help to prevent water damage to your roof and home by directing rainwater away from the foundation. However, Gutters and Downspouts can become damaged over time due to exposure to the elements. It is essential to regularly inspect your gutters for rust, leaks, and holes to ensure that they are in good condition and functioning correctly.
Checking for Rust
One of the most common problems with gutters is rust. Rust can cause significant damage to your gutters if left untreated. Signs of rust include orange or brown spots on your gutters. If you notice any signs of rust, removing it as soon as possible is important.
To remove rust from your gutters, use a wire brush or sandpaper to scrub the affected area until all the rust has been removed. Once you have removed the rust, apply roofing cement to prevent further damage.
Checking for Leaks
Another problem with gutters is leaks. Leaks can occur when holes or cracks in your Gutters and Downspouts allow water to seep through. To check for leaks, run water through your gutters and observe if there are any drips or puddles.
If you find any leaks in your gutters, it is important to seal them as soon as possible using roofing cement. This will prevent water from seeping into your home and causing mold growth.
Contact a Professional
If you’re unsure about the condition of your gutters or don’t feel comfortable inspecting them yourself, contact a professional for a free estimate on gutter maintenance services. A professional can help ensure your gutters are in good condition and functioning correctly.
Maintaining Your Gutters
Regular maintenance ensures your gutters remain in good condition over time. Here are some tips for maintaining your gutters:
Identifying and Fixing Holes or Gaps in Your Gutters
Inspecting Your Gutters for Holes or Gaps
One of the most important things to do is to inspect your gutters regularly. This includes looking for any holes or gaps that may have formed over time. You will need a ladder and a putty knife to remove any debris blocking your view.
It’s important to note that even small holes or gaps can cause significant problems if left unchecked. In extreme cases, they can lead to water damage, mold growth, and even structural damage. Therefore, it’s crucial to identify and fix any issues as soon as possible.
Fixing Small Holes with Gutter Caulk or Screws
If you notice small holes or gaps in your gutters, you may be able to fix them with some gutter caulk or screws. A gutter caulk is a type of sealant that can be applied directly onto the hole or gap using a caulking gun. It’s important to use a high-quality caulk that is specifically designed for gutters, as this will ensure a long-lasting repair.
Alternatively, you can use screws to patch up small holes or gaps in your gutters. Drill a screw into the affected area and tighten it until it sits flush with the gutter’s surface. This method is particularly effective for fixing small cracks or splits in your gutters.
Replacing Gutters with Larger Holes
Unfortunately, if the hole or gap in your gutter is too large, you may need to replace the entire gutter section. This can be a bigger job than simply patching up small holes with caulk or screws, but it is necessary to prevent further damage.
Choosing high-quality materials for climate and weather conditions is essential when replacing gutters with larger holes. Consider hiring a professional contractor with experience working on gutter repair jobs.
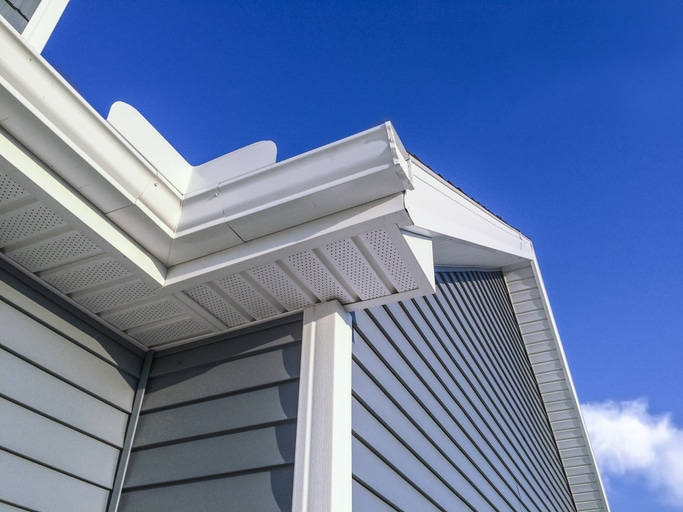
Ensuring Proper Installation and Shape Brackets
One of the best ways to prevent holes or gaps from forming in your gutters is to ensure proper installation and shape brackets. This means ensuring that your gutters are installed at the correct angle and that brackets properly support them.
If your gutters are not installed correctly, they may be more prone to damage from wind, rain, and other weather conditions. Additionally, your brackets are not shaped perfectly. In that case, they may stress your gutters unnecessarily, leading to cracks or splits over time.
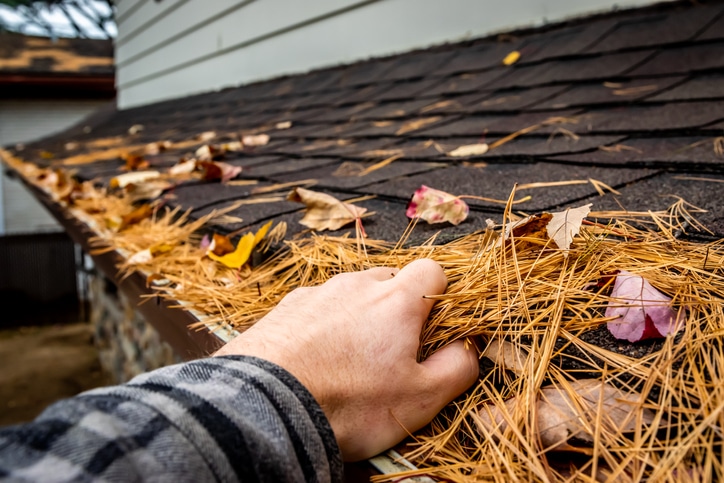
Tips for Effective Gutter Maintenance: Clearing Your Roof and Making Your Gutters Leafproof
Regularly Clear Your Roof of Leaves and Debris
One of the most important things you can do to maintain your gutters is to clear your roof of leaves and debris regularly. This will prevent them from falling into your gutters and clogging them up, which can lead to water damage to your home’s foundation or roof.
You can remove leaves and debris from your roof in a few different ways. One option is to use a leaf blower, which can quickly clear large waste areas. Another option is to use a rake, which can help remove smaller piles of leaves or debris.
Install Gutter Guards or Leaf Screens
Another effective way to prevent leaves from entering your gutters in the first place is by installing gutter guards or leaf screens. These devices are designed to fit over your gutters and stop leaves and other debris from getting inside.
Many gutter guards are available, so choosing one that’s right for your home’s specific needs is essential. Some options include mesh screens, foam inserts, and solid covers.
Trim Overhanging Tree Branches
If you have trees near your home, it’s important to trim any overhanging branches that could drop leaves onto your roof and gutters. This will help minimize the amount of leaves that fall onto your roof and ultimately end up in your gutters.
Checking Your Gutters Regularly
It’s also important to check your gutters regularly for any signs of clogging or damage caused by leaves and other debris. Look for signs like standing water, sagging gutters, or visible blockages.
If you notice any issues with your gutters, addressing them immediately is essential. Neglecting gutter maintenance can lead to serious water damage problems down the line.
Consider Hiring a Professional Gutter Cleaning Service
Finally, if you’re uncomfortable cleaning your gutters or don’t have the time to do it regularly, consider hiring a professional gutter cleaning service. These professionals can ensure that your gutters are thoroughly cleaned and maintained, which can help prevent costly water damage to your home.
Finding Local Gutter Repair Contractors: Exploring Solutions for Gutter Repair in Portland, OR, and Metro
Look for Local Contractors
OR and Metro area, it’s important to start by looking for local contractors. This will ensure you find someone familiar with the area’s specific climate and weather conditions. Additionally, local contractors are more likely to have experience working on homes similar to yours.
One way to find local contractors is by searching online. You can use search engines like Google or Bing to find websites of gutter repair companies in the area. Another option is to check online directories such as Yelp or Angie’s List. These directories allow you to read reviews from previous customers and get an idea of each contractor’s quality of work.
Consider Looking for Contractors in Nearby Areas
If you’re having trouble finding a local contractor, consider expanding your search radius to nearby areas such as Maryland and Virginia. Many contractors are willing to travel outside their immediate service area to get more business. Just ask about any additional fees associated with traveling outside their service area.
Check Online Reviews
Before hiring a gutter repair contractor, you must read online reviews from previous customers. This will give you an idea of each contractor’s quality of work and help you determine whether they are reliable and trustworthy.
When reading reviews, look for positive feedback from customers with similar work on their gutters. Also, pay attention to any negative reviews and how the contractor responded. A reputable contractor should be willing to address any customer concerns and work towards resolving them.
Ask for Referrals
Another great way to find a reliable gutter repair contractor is by asking friends, family, and neighbors if they have any recommendations. Referrals can be an excellent way to find trustworthy contractors who have already proven themselves through past work.
Be sure to ask about their experience working with the recommended contractor and whether they would hire them again. This will give you an idea of the quality of work provided and help you make an informed decision.
Get Multiple Quotes
Once you’ve narrowed your list of potential contractors, it’s time to start getting quotes. Contact each contractor and ask for a quote on the required repair work. Be sure to provide as much detail as possible about the work necessary so that they can provide an accurate estimate.
When comparing quotes, consider both the price and services offered. A lower price may seem like a good deal, but sacrificing quality or essential benefits, in the long run, may not be worth it.
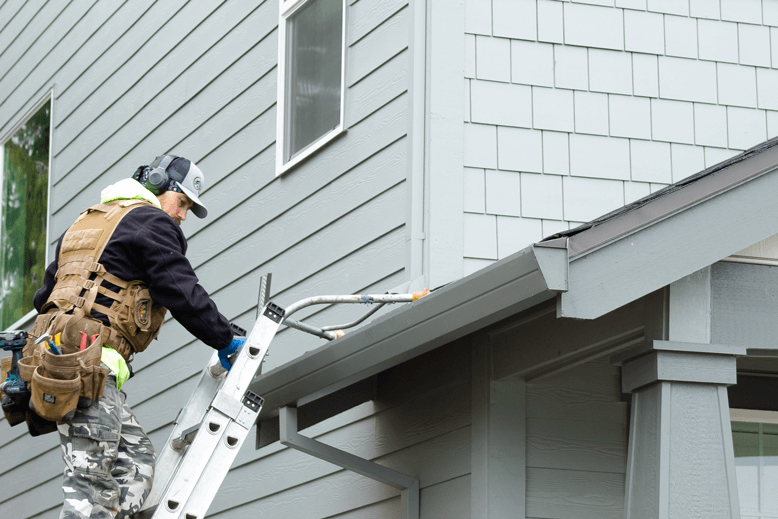
Inspecting Your Downspouts for Clogs and Blockages to Prevent Clogged Gutters
Regular gutter maintenance is essential to prevent clogged gutters and costly repairs. Downspouts are an integral part of your gutter system, and inspecting them regularly is crucial to ensure they function correctly. Clogs in downspouts can be caused by debris such as leaves, twigs, and other materials that can accumulate over time.
Inspecting Your Downspouts
To examine your downspouts for clogs or blockages:
- Use a ladder to climb up and check for any visible issues.
- Look for any signs of damage or rust on the downspout itself.
- Check if there are any visible clogs or blockages in the downspout opening.
Using a Hose
If you don’t see any visible clogs, you can use a hose to flush out any dirt or debris stuck inside. Place the hose at the top of the downspout opening and turn on the water with moderate pressure. The water should flow freely through the downspout without backing up.
Installing a Screen
Installing a screen at the top of your downspout can help prevent larger debris from entering and causing clogs. These screens are designed to fit over your downspout opening and allow water to pass through while blocking larger debris.
Scheduling Inspections
It’s recommended to schedule a downspout inspection at least once a year to ensure they are functioning correctly. Regular reviews can help identify potential issues before they become more significant problems that require costly repairs.
Professional Assistance
If you notice any issues during the inspection process, contact a professional gutter maintenance service or PO box for assistance. A professional service has specialized tools and equipment to clean out stubborn clogs safely.
Best Gutter Guards (Review): Comparing the Top Products for Protecting Your Gutters
Gutter guards are an essential investment for homeowners to protect their gutters from clogging due to debris, leaves, and other materials. They are designed to prevent water damage to your home by keeping gutters clean and free-flowing. Gutter guards come in different materials, designs, and installation processes that can affect their effectiveness and price.
Comparing quotes from different gutter guard providers can help you find the best product for your budget and needs. However, it’s essential not to compromise quality for affordability. You want a gutter guard that is durable, low-maintenance, and effective in preventing clogs.
When looking for gutter guards, consider the material used in making them. Some of the most common materials include aluminum, stainless steel mesh, plastic, foam inserts, and brush-like bristles. Each material has unique features and benefits that you should compare before purchasing.
Aluminum is one of the most popular choices because it’s lightweight yet sturdy enough to withstand harsh weather conditions. Stainless steel mesh is another excellent option because it’s rust-resistant and can filter out small particles like pine needles.
Plastic gutter guards are affordable but may not be as durable as metal ones. Foam inserts work by blocking debris while allowing water to flow through, but require frequent cleaning or replacement. Brush-like bristles are effective at keeping leaves out but may trap dirt or seeds that can cause clogs over time.
Another factor to consider when choosing gutter guards is their design. Some designs cover only the top of the gutters. In contrast, others extend down into the downspouts or attach directly to the roof shingles.
Gutter Helmet is one of the top-rated gutter guard products today. Its patented nose-forward design deflects debris away from gutters while allowing water to flow freely through them. It also comes with a lifetime warranty against clogs or damage caused by debris buildup.
LeafFilter is another popular choice among homeowners because its micromesh technology can filter out even the smallest particles while allowing water to flow through. It also has a no-clog guarantee and comes with a lifetime warranty.
It’s a budget-friendly option that effectively protects against clogs and debris buildup. Its snap-in design makes it easy to install without screws or adhesives. Comparing these top-rated gutter guard products can help you find the best one for your home. However, remember that installation plays a crucial role in their effectiveness. Poorly installed gutter guards can cause more harm than good by trapping debris or causing water damage to your roof or foundation.
Understanding the Risks of Unmaintained Gutters and the Benefits of Installing Rain Barrels
Clogged gutters can cause significant damage to your home, leading to costly repairs. Water damage is one of the most common and expensive types of damage homeowners face. When gutters become clogged with leaves, debris, and other materials, they cannot correctly channel water away from your home’s foundation, roof, and walls. This can lead to water seeping into your home’s foundation or walls, causing structural damage.
Unmaintained gutters can also attract pests like mosquitoes, rodents, and birds. These pests can carry diseases and cause further damage to your property. Mosquitoes breed in standing water, which can accumulate in clogged gutters. Rodents and birds may build nests in the debris-filled gutters.
Installing rain barrels is vital to prevent these risks associated with unmaintained gutters. Rain barrels are a simple solution that can help reduce the risk of water damage by diverting excess water away from your home’s foundation and storing it for later use in your garden.
One of the benefits of installing rain barrels is that they help conserve water. By collecting rainwater instead of relying on municipal sources for watering plants or lawns, you can save money on your water bill while reducing demand for local resources.
Rain barrels also provide a free water source for your plants and lawn. This means you won’t have to rely on expensive irrigation systems or hoses to keep your yard green during dry spells.
In addition to saving money on utilities and helping conserve resources, using rain barrels can also help reduce flooding and erosion in your community. By capturing excess stormwater runoff before it enters storm drains or streams, rain barrels help slow down the water flow during heavy rains. This helps prevent flooding downstream by reducing the volume of water entering streams at once.
Rain barrels can also help reduce your carbon footprint by decreasing the energy needed to treat and transport water to your home. Municipal water treatment plants use significant energy to clean and purify water, contributing to greenhouse gas emissions. Using rainwater instead of municipal sources can reduce your carbon footprint and help protect the environment.
Essential Tips for Maintaining Your Rain Gutters and Downspouts: Regularly Cleaning and Checking for Damage
Regularly Cleaning and Checking for Damage: Essential Tips for Maintaining Your Rain Gutters
Cleaning your rain gutters is essential to prevent clogging and water damage. Neglecting rain gutter maintenance can lead to severe problems, such as water damage to your home’s foundation, roof, and walls. To avoid these issues, cleaning and inspecting your gutters at least twice a year is essential, especially before and after the rainy season.
Use a Wire Brush to Remove Debris and Buildup from the Gutters and Downspouts
A wire brush is one of the most effective ways to clean your rain Gutters and Downspouts. A wire brush can help you quickly remove debris and buildup from the gutters and downspouts. It is essential to wear gloves when using a wire brush to protect your hands from sharp objects that may be present in the debris.
Regular Maintenance of Your Rain Gutters Can Save You Money in the Long Run by Preventing Costly Repairs
Regular maintenance of your rain gutters can save you money in the long run by preventing costly repairs. Suppose you neglect your Gutters and Downspouts for an extended period. In that case, they may become clogged or damaged, which could lead to more significant problems down the line. By regularly cleaning your gutters, you can ensure they are functioning correctly, reducing the risk of expensive repairs.
Check for Any Signs of Damage, Such as Cracks, Holes, or Rust, and Repair Them Promptly
Regularly checking for any signs of damage, such as cracks, holes, or rust, on your rain gutters is also essential. If you notice any damage during inspection or cleaning, it is crucial to repair them promptly. Ignoring minor injuries could result in more significant issues later on.
Make Sure to Clean and Inspect Your Gutters at Least Twice a Year
As mentioned earlier, Gutters and Downspouts maintenance of your rain gutters is crucial in preventing water damage. Therefore, cleaning and inspecting your gutters at least twice a year is essential. It is also advisable to do this before and after the rainy season. During these inspections, you can identify potential problems early on and take necessary measures to prevent them from escalating.
Examples of Water Damage Caused by Neglected Rain Gutters
Neglecting rain Gutters and Downspouts maintenance can lead to serious water damage issues in your home. For instance, clogged gutters can cause water to overflow onto the roof or walls, leading to rotting or mold growth. Additionally, if water seeps into your home’s foundation, it could weaken the structure over time.
Social Proofs: The Importance of Regular Gutter Maintenance
According to a survey conducted by HomeAdvisor, 90% of homeowners believe that regular gutter cleaning is essential for maintaining their homes’ value. Furthermore, 75% of homeowners said they would hire a professional service provider for gutter cleaning.
Statistics: The Cost of Neglecting Gutter Maintenance
The cost of neglecting rain Gutters and Downspouts maintenance can be significant. According to the National Association of Insurance Commissioners (NAIC), water damage accounts for nearly 22% of all homeowner insurance claims. In addition, NAIC reported that the average claim amount for water damage was $10,234 in 2019.
Taking Care of Your Gutters is Key to Protecting Your Home
Your gutters are an essential part of your home’s exterior. They protect your roof, foundation, and landscaping from water damage by directing rainwater away from your house. However, neglecting your gutters can become clogged with leaves, debris, and pests like mosquitoes. This can lead to leaks, rust, holes, or gaps in your gutters, which can cause severe damage to your house over time.
Regularly caring for your gutters is important to avoid these problems and keep your home safe from water damage. Here are some tips for maintaining the quality work of your gutter system:
1. Checking for Rust, Leaks, and Holes in Your Gutters
Check for rust spots on the metal parts of the gutter system, as this may indicate that the gutter needs replacement. Look out for any leaks or holes in Gutters and Downspouts that could be causing water to overflow onto the sides of your house instead of flowing through the downspouts.
2. Identifying and Fixing Holes or Gaps in Your Gutters
If you find any holes or gaps in your gutters while checking them out for rust and leaks, then fix them immediately using a sealant or patch kit designed specifically for gutters.
3. Tips for Effective Gutter Maintenance: Clearing Your Roof and Making Your Gutters Leafproof
To prevent clogs in the first place, clear off any debris, like leaves, that have accumulated on top of roofs before they fall into gutters. You can also install leaf guards to help keep debris out while allowing water to flow freely..
4. Finding Local Gutter Repair Contractors: Exploring Solutions for Gutter Repair in Portland OR and Metro Areas
If you’re uncomfortable doing maintenance work, consider hiring a professional provider specializing in roofing repairs or gutter cleaning services within Portland, Or, and the Metro area.
5. Inspecting Your Downspouts for Clogs and Blockages to Prevent Clogged Gutters
Ensure that your downspouts are free of clogs or blockages preventing water from flowing through them. This will help prevent clogged gutters and overflowing water.
6. Best Gutter Guards (Review): Comparing the Top Products for Protecting Your Gutters
Many gutter guards are available in the market today, each with pros and cons. Research before buying one to ensure you choose the right product that suits your needs.
7. Understanding the Risks of Unmaintained Gutters and the Benefits of Installing Rain Barrels
Unmaintained gutters can lead to damage not only to your house but also to surrounding areas like landscaping, driveways, and walkways. Installing rain barrels can help you save money on water bills while protecting your home from water damage.
8. Essential Tips for Maintaining Your Rain Gutters: Regularly Cleaning and Checking for Damage
Regular cleaning is essential to keep your gutters functioning correctly. Wear gloves when cleaning gutters as they may contain sharp edges or debris that could cause injury.
Protect Your Oregon Home with Expert Gutter Services
Regular gutter maintenance is one of the smartest investments you can make to protect your Oregon home. Whether you need help with gutter cleaning, gutter repair, gutter installation, or adding gutter guards to reduce future maintenance, Gutter Empire has you covered.
Our experienced team ensures your gutter system is functioning at its best year-round, safeguarding your roof, foundation, landscaping, and basement from costly water damage. Don’t wait for small issues to turn into expensive repairs — contact us today for a free estimate and let our experts help you create a customized maintenance or installation plan that fits your home’s needs.
Keep your home dry, secure, and beautiful in every season — reach out to Gutter Empire now and enjoy peace of mind, rain or shine!